Thursday, March 22, 2012

The gangs all here

Today I added the remaining 22 fish into the 800 gallon aquaponic fish tank.  They were very happy to see their old friends and a good time was had by all.

I built a light fixture today with 16 CFL bulbs in a straight line 8 feet long.   It's a lot of light, but I may need two.

Costco has a good price on 23W 1600 lumen CFLs (about $8.00), but there were some rebates that knocked another $2.00 off the price.  So each box of 4 costs $5.99 right now.    I was going to use T5 bulbs, but I saw that, and did the math.
I'm waiting for a response from the manufacture for more information about the light spectrum.  All I have been able to find so far is that they are "Full Spectrum".  I'm hoping this will work for me, if not Costco will take them back.

I'll post a picture of my finished grow lamp after it's painted, and the specs if I hear back from Feit Electric.

Here are the specs on the CFLs that Devin Duhaime is using very successfully.

Philips 41409-4 - 26 Watt - CFL
100 W Equal - 5000K Full Spectrum - 82 CRI - 114 Lumens per Watt - 15 Month Warranty

Monday, March 19, 2012

I love bacteria!

Yeah!
It's been 21 days since I started cycling the system.  Overnight the Nitrite levels fell to an acceptable level..
It's simply amazing to see the results of a Nitrospira bloom.
Just 12 hours ago this test was still off the chart purple.

It always seems to take about three weeks to get the bloom, but here are a few things I did to hasten the process.
  • Gravel from the existing Koi pond was used in the grow bed, but it's been cold and may not have had an active culture.
  • One small bottle of NiteOut was added at the beginning.  To be fair they suggest much more.
  • Aqua Gold was also added on the first day.
  • During the past two days I have been adding water from my aquarium, and even rinsed that bio filter in the water.
  • Limited the draining of the grow bed to half way (may not have been the best thing to do)
My take on the actions above are that the commercial additives quickly promote ammonia conversion, with bacteria and enzymes, but the Nitrite conversion takes time.  My feeling is that Nitrite will always take about three weeks with or without the commercial additives.

For many years the bacteria responsible for ammonia conversion were thought to be Nitrasomonas species, but more recent research indicates that these bacteria may do little or nothing in freshwater, and that bacteria known as Nitrosococcus may be the true ammonia-oxidisers.
NiteOut claims to contain select strains of Nitrosomonas, Nitrospira and Nitrobacter.
  • Nitrosomonas oxidize ammonia to nitrite
  • Nitrobacter and Nitrospira oxidize nitrite to nitrate

It was originally thought to be Nitrobacter species which were responsible for nitrite conversion to nitrate, but again, recent research (by Dr. Timothy Hovanec and others) indicates a different group of bacteria - Nitrospira - are responsible, but NiteOut includes both.


I added eight of the largest fish into the 800 gallon tank today!


Saturday, March 17, 2012

Fish Food

For fingerlings 
1/16" 50% protein pellets from Arthur Aquatics CLICK HERE

For your larger fish
I discovered my local Tractor Supply does not carry the brands listed on their web site.
What I ended up buying is Purina Game Fish Chow.
It's 20 pounds for $12.99 - 65 cents per pound

Guaranteed Analysis
Crude Protein, not less than 32.0%
Crude Fat, not less than 3.0%
Crude Fiber, not more than 6.0%
Phosphorus (P), not less than 0.8%

Supposedly there is a mix of pellet sizes, but I did not find much difference. Most are about 3/16" and I ended up putting it through a blender so that my 4" fish would be able to eat it.


Below are the products listed at the web site.
These fish foods list for less then 75 cents a pound. 
 
Catfish Diet - Crude Protein (min.) 32.00%, Crude Fate (min.) 4.00%, Crude Fiber (max.) 7.00%.
Trophy Fish Feed - 36% protein
Farm Pond Diet - Crude Protein (min.) 36.00%, Crude Fat (min.) 5.00% and Crude Fiber (max.) 6.00%


Product Comparison
 

Nutri Source® Catfish Diet Floating Fish Food, 50 lb. image
506005599
remove
Sportsman's Choice® TrophyFish™ Feed image
107773399
remove
Nutri Source® Farm Pond Diet Floating Fish Food, 20 lb. image
506006399
remove
PRICE $17.99 $12.99 $12.99
PURCHASE OPTION Available in-store only.
Please check your local Tractor Supply Company store.
Available in-store only.
Please check your local Tractor Supply Company store.
Available in-store only.
Please check your local Tractor Supply Company store.
NAME Nutri Source® Catfish Diet Floating Fish Food, 50 lb. Sportsman's Choice® TrophyFish™ Feed Nutri Source® Farm Pond Diet Floating Fish Food, 20 lb.
TYPE N/A Nugget Mixed-Particle
BRAND Nutri Source® Sportsman's Choice® Nutri Source®
LIFE STAGE Adult Any All
ANIMAL TYPE Catfish Fish Fish
PACKAGE SIZE 50 lb. 25 lb. 20 lb.


Friday, March 16, 2012

My Spin Filter

I have to admit this did not work as well as I had hoped.  But I'm sharing my triumphs as well as my failures so that others can also learn from what I'm doing.

It will be interesting to see how well this spin filter works when I add the fish.  While it's not exactly as I had  hoped I believe it will make a significant difference.

UPDATE 12/23/2012
As the fish grew and the demand increased it became apparent that this was only marginally useful as a settling tank.  Maybe a better design would be more effective.

Below are links to two short videos that show the currents and settling of Koi food

Test with floating Koi food

Test with sinking Koi Food

Wednesday, March 14, 2012

Tour my Aquaponic System

Nearly finished
Please let me give you a tour of my aquaponic grow room.  
It's not quite finished, but I want to show you the progress I've made.    


Thursday, March 8, 2012

This is my tank heater

UPDATE:
2013/01/18
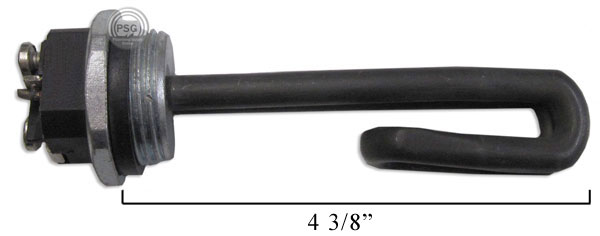
Several months ago I built this heater with a stainless steel element. It's actually refered to as an Incoloy type water heater element  (120-1500-ELD.

You can purchase them online here at http://www.plumbingsupply.com/elements.html

This heater now floats in the sump tank.  It's very important to add something buoyant at the end opposite the cord so that air bubbles leaving the element do not get caught in the small area where the element screws into the plastic housing.  Even this very small amount of exposure will burn out the element.


Previous Designs


 2012/03/19
Today I made the mistake of unplugging my pump while the heater was on.  PVC smoke quickly filled the room and the element died.
.
Here is my new design.  It's made of 1" galvanized pipe, but the element will still self destruct withing seconds if it's run dry so I have moved it to a position below the level of the sump tank.  The outlet is above the fish tank so it will not draw a siphon but the water level will drop to the level in the sump tank.
If I should loose the pump the water will boil inside the pipe, but this galvanized pipe will not burn.
The thermostat can not operate at boiling temperature, and will still burn and self destruct within seconds if the water is not flowing.  At least this will prevent heating galvanized pipe. - Just looking for a bright spot to an unpleasant situation...

I will not be using the Honeywell Thermostat because the water changes so slowly that I can regulate it as I wish by flipping the switch on and off.  The temperature changes by about 4F per day.
 
If I ever choose to hook up the thermostat I think I may be able the use the high cut off temp as a safety.
But there has simply been too much to do.

My plan is to use an 1-1/2" PVC elbow to cover the electrical connections.

Original Post:
This is my heater. It uses two 1500W elements in series to drop the current down below 8A which is the max amperage my Honeywell 675 thermostat will handle.  In this picture I am using only one element without the thermostat in order to deliver more heat.
It's an inline flow through heater. It works very well and should last for many years. As long as water flows through the heater it will not over heat.  I would like to add a relay that will only allow the heater to be on when the pump is on and water is flowing.
The elements are rated at 1500W, but measurements indicate only 1300 W are actually being used when only one element is used, and when placed in series 750 W is drawn.  I attribute the difference to line loss even though the building is wired with 12 gauge.
The elements screw into 1" female adapters.  The housing is made of 2" PVC.  When I put my hand on the heater, I can just barely feel the heat, but over time it will maintain my 1000 gallon system which is well insulated.

Tuesday, March 6, 2012

Bell Siphon - My Conclusion

UPDATE -After 6 months my bell siphon failed to start siphoning.
Here you will find the best way to break the siphon, but I have abolished any further use of Bell Siphons because they are and always will be prone to failure.  
I am now using

Drip Dry Flood and Drain

But if you insist upon a bell siphon the instructions below are your best bet

 
I have found the answer to the Bell Siphon Blues. I have found a way to make any Bell Siphon absolutely 100% trouble free. Below you can read about my anguish and how I labored to get my Bell Siphon to work. Twice I thought I had it right.  Each time it worked for over a week without flaw, and then quit working.

There is a lack of real engineering available, and even the College of Hawaii failed to provide a mathematical reason for how a Bell Syphon works.   I will not provide the math either, but when you see my solution it will be so obvious that you will not need anything else.


First Stand pipe with 1-1/4 extension.
When screwed in it stands 8-7/8" tall including the bulkhead. 

New stand pipe goes directly to 1" from 2". 
The top is slightly smaller as the first standpipe used a coupling.


This is the tail piece without the 1" male adapter as shown below 

Exactly the same as  above except the horizontal section is 1" longer
It's difficult to see in this photo due to camera angles,
but there is 3/4" of air space above the standpipe,
the bulkhead adds about 3/8" to the height of the standpipe .
I don't believe the air space is critical.  I used to have about 4" of air space and it still worked.  I think the important thing about the air space is not to restrict it by too much.

Here are the differences 

The Tailpiece
By shortening the horizontal section of the tailpiece I shaved 1 or 2 seconds off the siphon break.
By lengthening the horizontal section by 1" the siphon will not break.

The Standpipe
With the 1-1/4" section of the standpipe
  • Drain Time (Siphon catch to catching air) - 3:52
  • Catching air to flow stop     - 0:12
  • Flow stop to burp               - 0:17
Without the 1-1/4 section of the standpipe
  • Drain Time (Siphon catch to catching air)  - 2:45
  • Catching air to flow stop      - 0:17
  • Flow stop to burp                 -0:05

My pump is rated at 500 GPH at 1 foot head with a maximum head of 17 feet.
I have a 2-1/2 to 3 foot head.  It varies due to the level of the sump, but the fish tank buffers any difference in flow.

Conclusion 

My preference is the standpipe with the 1-1/4" extension. I ran the tests several times and recorded the events in order to get a verifiable test.  Without a doubt the standpipe with the 1-1/4" extension not only broke siphon faster, but it did it with a more profound and determined manner.

I spent well over 30 hours fine tuning this siphon.  My advice is to find someone who is willing to share their GPH flow and exact siphon design and then follow that.  In the real world your system is going to differ slightly from every other system so even if you try to duplicate another siphon you will probably have to spend time fine tuning it.  Have patience, experiment till you find something that works for you.  Taking a video of the test will prove to be very helpful. 
In my initial testing I used a hose between the sump and the tank.  After hard plumbing the pump into the system my flow rate increased slightly and the siphon no longer broke siphon.  Minute changes can make all the difference. 

Click Here To Watch Test 1
Click Here To Watch Test 2 

I have not tested this, but I believe it best to build your bell siphon so that it can break siphon at a flow rate higher than your system runs at.  If it will break siphon at a high flow rate then it should break at a slower rate too.

Here is a link to Construction of Automatic Bell Siphon from the College of Hawai