Showing posts with label Experiments. Show all posts

Sunday, September 23, 2012

Vertical Garden Sausage

This is my Vertical Garden Sausage.  After pricing pipe and stacking gardens I started thinking about ways to do it less expensively. 
This is made of fiberglass reenforced weed cloth.  I glued the seems with Goop Marine Glue and filled it with Perlite.  I imaging other media such as compost or Vermiculite could be used instead.
I was able to use the same pump that I pump water into my fish tank to drip water into the top. 
The advantage I see in vertical gardening that the produce is within easy reach, less media than a standard grow bed is used, plenty of aeration,  easy to manage in sections. 
Seeds can be started directly in to sausage, but I had these seedling and used them to get it going.

Nine Days Later


I've made more since first posting this and have been using regular Type 1 silicon.   Type 1 silicon is safe for fish.


Nate Storey shared his vertical setup
 

Wednesday, September 12, 2012

Is Water Flushed From A Filter Better?

I've often heard people say water flushed from a filter is better for your plants. 
I wondered how true that is.  Is It higher in Nitrate?
Here's the test.
It's higher in some trace elements, but don't count on it for Nitrate.

The problem with dumping this on your terra-garden  is that this nutrients are lost from the aquaponic system.

Saturday, September 8, 2012

Fluidized Moving Bed Experiments

I was eagerly running the tests below when I started to explain my reasons for looking outside of conventional aquaponic methods to Rob Nash who questioned my reasoning. While writing I came full circle and saw that he was right. It comes down to adding more media beds not creating a great bio filter without plants 

I've been saying it's all about the Nitrates and began to see that as my primary goal. I kinda got off track, and lost focus from the real goal which is to provide Nitrates to as much high density growing space as possible.

I've got to quit thinking like an aquarium owner and more like a farmer. .But Moving Bed Filters have the place in aquariums and aquaculture.  I ended up using the test bottle in my aquarium as a vibration filter and I created this post anyhow since it might help someone else either avoid the derailed course I had set.

It might spark an idea that willl lead to a low cost replacement to the expensive alternatives.


Evaluation of Alternative Moving Bed Media 

 
This was my first test using pumice.  

Second test using climbing rope

Third test using a variety of media


This is my vibration filter. This 40 gallon tank needed a little more bio filtration. 

This bottle was left over from the moving bed media experiments and worked well.
It's a little too tall to place it in my sump, so it's in the aquarium.  
I got the basic idea for a vibration filter from TYNE VALLEY AQUATICS, but I added an air line to give it full aeration and a bit more shake.


Here's a design that looks promising

Monday, September 3, 2012

Idea for Vertical Gardening

I just had an idea for Vertical Gardening! 
The strong fiberglass reenforced weed cloth could be sewn into a tube.  The bottom sewn shut as well. 
Then the tube is hung and filled with Perlite
Small holes can then be cut where you wish to insert plants.  


Water dripping from above keeps the vertical garden moist and a tub at the bottom collects the excess to be returned to the fish tank, or better yet just hang the tubes over the fish tank!

The cost would be extremely low.


Next best idea is to use Solid Drain Field pipe.
Here's my contractor prices in California for pipe.
4" Sch 40          - $2.12
4" class 200     - $1.95
4" Drain Field  - $0.74

6" Sch 40          - $3.68
6" Class 200     - $4.33
6" Drain Field  - $2.48
Traditionally the vertical tubes havebeen made of PVC

Wicking Pool

I've been designing a low cost system aiming  the lowest possible utility demand, and the best nitrification possible.
I have a theory that it's all about the nitrification and the production of Nitrate.  Nitrates make your plants thrive so let's make an abundance of it.

Your fish will love you for creating a pollution free tank for them to grow in, but it takes fish food and waste to bump the Nitrates up.  If the water remains clean the plant roots and your fish will be happy to eat all you can feed them.  Grow them out big and push the Nitrates!

Throughout the process I kept coming back to the basic above ground pool as a combination fish tank / grow bed / bio filter. It's big and cheap, and the cost of pumping will be reduced if the nutrients are allowed to circulate below the surface rather than vertically.

Solids extraction always seems to be a hangup with this idea.
So far I've only come up with two options - Scuds or a pool vacuum.

My best ideas for pure water seem to center around Moving Bed Filters. The main advantage is a smaller filter which will hopefully require a less powerful pump

Next problem is how to keep the roots safe from the fish?
So far Wicking Pots or a standard net pot raft with a screen attached to the bottom of the raft have been my best options.
James Troyer suggested to me that I could sew a basket from weed cloth and hang it in the water from PVC buoys.  This Wicking Basket would remain moist and the basket could be filled with compost to further enhance the grow media

Does any of this sound like the right direction?  This has become an obsession and is causing me to neglect my daily responsibilities.   But I keep thinking I'm getting so close. I often find myself justifying just one more experiment or research one more idea.  I'm finding it difficult to let go of this as I feel this is getting very close to the ultimate backyard system.


The perforated cylinder, barrel or IBC would be fed by an airlift pump, or air would be pumped under the media to maintain a flow.  This would create a large bio filter for the conversion of Ammonia to Nitrate.  I have begun experimenting with fluidized filters. So far this idea looks very promising.  I believe a well designed fluidized filter would drastically reduce the required volume of the bio filter.

My experiments with Airlift Pumps have been marginal and trying.  At this point I'm ready to go with an impeller pump.I believe the airlift pump requires more depth than the shallow depth of the pool allows.


Air stones would also be placed along the edge of the pool to further aerate the water where the fish would have full range of the pool.
The plants would be suspended on rafts which hold the media filled fabric 'Smart Pots' at the surface allowing them to wick water.

Total power used would be 1 - 50W 70 lpm air pump.
1 -  240W solar panel with battery storage and a 400W inverter would supply power 24/7.

Test results for a raft idea:
I filled a 10" pot with wet pumice.
The filled pot weighed 6Kg.
An 8" pot weighed 2.5Kg
6Kg should displace 600000 cubic mm.
I then floated the pot on a piece of foam insulation 1105mm X 457mm = 50490 sq mm.
As calculated about 11.9 mm was displaced.
Two pieces of 1-1/2" insulation bend a little but this confirms the displacement.

I calculated that a piece of foam about 15"x15" would displace about 1-1/2" for a 10" Smart Pot filled with wet pumice.  The raft could be covered with a wicking cloth or a hole could be made for the pot to set into and make contact with the water.  I imagine a few large rafts with several pots on each would be best to maintain stability and avoid tipping over.

One issue that may need to be addressed is solid waste removal.  I'm open to suggestions.
Possibly a pool vacuum would work.

Cost:
1 - Above ground pool.  (Seasonally inexpensive in the fall.)   $200.00
1 - 70 Air pump                                                                   $70.00
1 -  Perforated container   (IBC)                                         $90.00
3 yards of media (Price varies)                                         $200.00
Rafts (2 sheets foam insulation? )                                    $70.00
Smart Pots                                                                        $150.00
_____________________________________________________
Total                                                                                   $780.00


Solar panel
Charge controller
Inverter
Batteries


Saturday, September 1, 2012

Alternative Water Pumps


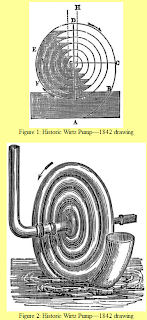
The Spiral Pump aka Wirtz Pump might be an alternative for those looking to pump water using wind, solar or water flow from a stream.

The Spiral Pump requires very little energy, and can utilize various methods of mechanical energy
The pump takes advantage of the entrapped air to achieve remarkable head pressure.
Unlike a Ram Pump, this pump is quiet and very simple.

Another pump worth looking at is the Geyser Pump. aka Airlift Pump

Calculations for Airlift Pumps can be found starting on page 50 of this PDF from Kieth Tatjana

A simple spreadsheet for Airlift Pumps


This is my quick Geyser Pump

Several days later I added a check valve as seen in the videos below.  I pumped 4 lpm of air into the airlift pump and got almost as much water back out in return!   70 lpm in may not deliver the same results, but I will post the results when and if I get around to making that test.


Here's another method - the Airlift Pump


Another look at the Glenn Martinez Airlift Pumps


AquaLab: Ex 06 Airlift pump experiment demo

Skip Kemp has more aquaculture videos that you may find interesting


But this may be my favorite! 


Real Pit Bull Demo


This Wiki Link shows many types of pumps.
I am a little disappointed they did not include the Tesla Turbine


Thursday, August 2, 2012

The Bottom Line On Aquaponics

(Update link at bottom)

My venture into aquaponics has been an experiment, and while I have attempted to keep the costs reasonable I have made some poor choices and at times had to compromise practical energy use in order to experiment. But this is what experimentation requires in order to learn.

Below is fairly an accurate assessment of my costs.  I used a 'Kill-A-Watt' meter for accurate measurement of each appliance.  I have chosen to use $0.30 per KWH because I'm so far over baseline electric use.  It's really embarrassing.  

This spreadsheet is available in Open Office format.


A major cost of operating my indoor system has been movement of air.   Air is important, so finding ways to move it less expensively will be my first priority.  Currently I'm using a 20" box fan, but I will replace it with a smaller fan that uses only 30 Watts.

Air stones are also required whether inside or outside.  I'm using a Hydrofarm 52 Watt 70-LPM Active Aqua Commercial Air Pump.  Several smaller pumps may be sufficient, but this one pump supplies all my needs.

Moving water is also a large expense.   External pumps are less expensive on a per gallon basis, and with the newly expanded outdoor system I will be upgrading to a larger external pump as indicated in the spread sheet.

So far my systems have all relied upon a constant flow of water.  I am not fond of Ebb & Flow systems and have no plan to switch over,  but an Ebb & Flow system where the pumps are run intermittently to save energy may be the only way to cut this expense for some.   My plan is to expand my systems to the point that production out paces the cost of pumping water.

I have also learned that buried tanks are only somewhat helpful in stablizing the temperatures.
For example,our weather has consistently ranged from 66F and night to 100F during the day for about a week, and has been near that for even longer.
My 10' x 3' 1600 gallon above ground pool is 75F
My  1300 gallon fish pond with a 3'x7' above ground bio-filter is 72F
My IBC system uses 3 - 275 gallon IBC's.  The sump tank is buried and the fish tank is not.  The last IBC is cut in half, and serves as two above ground grow beds.  The temperature is 75F
My climate controlled indoor system is kept between 70F and 85F.  The water is 75F.

I have measured my pond during the winter at 58F, but this year I will keep better records of all these systems.  Last winter I supplemented the heat in the indoor system about 4 hours per day using a 1250W inline electric heater.

These costs can only be justified if the systems were to produce thousands of dollars worth of food.
My assessment is that large scale commercial systems may be able to  break even or better, but small backyard aquaponic enthusiasts with 100 sq ft of grow bed are going to face lower returns while still incurring many of the same costs.

Green house gardening with supplemental light during the winter's short day light is expensive, and demands that the green house be built with plenty of insulation.  My indoor system is proof that maintaining temperature in an insulated green house is feasible.  But the added cost of moving air and supplementing the light adds a significant expense which may only be justified in a commercial system where year round product is expected by the clients.  To be fair I recently read of a commercial system where 30,000 lettuce were grown in a 500 sq ft indoor room under artificial lights.  No financial records were available.

In conclusion barring the many other disastrous things that can go wrong in artificial systems, it seems 
outdoor farming is the least expensive, and may be the only economical option for backyard aquaponists.  Living in a temperate climate, and raising high demand crops, and fish appropriate to the local climate on a scale that offsets the base expenses could also help make an aquaponic venture economic feasibility.  But amortizing the cost of building, and maintaining the system has not even been address in this study.  Also solar heating and photovoltaic system integration may help improve the economy, but so far I have not incorporated this into my systems.

The bottom line is that it's either a fun hobby with expenses that will in all likelihood never find a return beyond the pure enjoyment of producing food and overcoming the many problems involved, or a high risk business venture.  

Indoor System
Outdoor IBC System


I'm happy to say my energy efforts have begun to work!

UPDATE:  This is an idea I have for an outdoor system that will consume only 1.2KWH per day!


Thursday, April 5, 2012

Keeping a log

Keeping a record of your water chemistry and environment can help you understand the cause of any problems you may have later.

Here is a spreadsheet that I use to record my data.

You may choose to take samples less often, but since my system is still new I feel that every day is best for me.

Edit as you see fit.

This is an Open Office Spread Sheet.   (Please support Open Source programing and information.)


Friday, March 16, 2012

My Spin Filter

I have to admit this did not work as well as I had hoped.  But I'm sharing my triumphs as well as my failures so that others can also learn from what I'm doing.

It will be interesting to see how well this spin filter works when I add the fish.  While it's not exactly as I had  hoped I believe it will make a significant difference.

UPDATE 12/23/2012
As the fish grew and the demand increased it became apparent that this was only marginally useful as a settling tank.  Maybe a better design would be more effective.

Below are links to two short videos that show the currents and settling of Koi food

Test with floating Koi food

Test with sinking Koi Food

Sunday, February 5, 2012

Evaporative Cooler Design

Yesterday I installed a whole house fan in the grow room. I could purchase an evaporation cooler but I've never been trilled with the designs. This is my design similar but better IMHO than a MasterCool. I will duct the air from this cooler into the room and let the whole house fan pull the cool air in.
Click Here for my SketchUp Files

This is the water section of an evaporation cooler. It contains three sub-sections, the Drip (Gray), Filter(Blue), and Reservoir (Yellow). A squirrel cage fan connected to the back face draws air through the filter section. The drip section contains 1/2" PVC drip tubes. This top section is removable in order to replace the paper pads The paper pads are supported front, back and bottom with 1/2" PVC in the filter section The filter section is made of fiberglass. A pump and float sit in a fiberglass reservoir section providing easy access. The filter section can be stacked with only one drip section (Gray) at the top and only one reservoir section at the bottom. This will create an even larger cooling unit I was not able to extrude the drip pipes or connect the pump as I would like.

Friday, January 20, 2012

Thermal Solar Collector


This guy probably has a better idea.  But I will leave the rest of my post in place because it might stir an idea


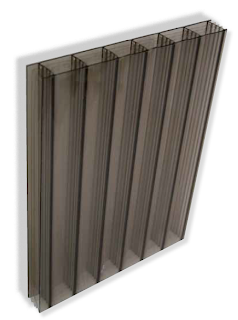
The Polycarbonate sheets shown here are refered to as Twin Wall and 5 Wall. They are extremely strong and UV protected, and often used for greenhouse glazing.

While I have seen polycarbonate used as a collector's glazing I have not been able to find an example of this type of material used as the conduit for a thermal solar absorber.

This light weight material would appear to be near to perfect for this application if placed in an insulated box with a black background.  An extra layer of glazing may not even be necessary.

The area would be well utilized with water passages, and at $57.00 for a 4x8 sheet the price is reasonable.


A manifold could be created by cutting back the inner walls by about 1/2 " and then sealing the end with an end cap.  A PVC quick connect could then be inserted into the side of the end cap for the plumbing.

Wood sides, rigid insulation, and twin wall polycarbonate, with a black absorber behind the polycarbonate sheet.  I've shown the end cap as translucent to provide an exposed view of  the inside channels which have been cut back  to create a manifold.  The extra strength of the end cap will make the quick connect more secure.   The end caps can either be sealed with an ultrasonic or solvent weld.

The melting temperature of extruded polystyrene is 240F well above the maximum temperature I would expect. 

2" of extruded polystyrene would offer an R-Value of about 10.

For a 4' x 8' collector the polycarbonate should weigh about 18 lbs. and 2" of  extruded polystyrene about 6 lbs.   A wood case is going to be the heaviest part of the panel.  A  4x8 sheet of 1/2" plywood weighs about 48 lbs.  and 24' of 1x4 pine weighs about 24 lbs. for a total of 18+6+48+24=96 lbs.  72 lbs coming directly from the case.

If a case were made of aluminum sheet metal,  I expect it would weigh about 25 lbs less and it would look more professional.  Since I often work alone I'm always thinking of weight.


Update 2012.01.22:

I found a some information about experiments using "Black Liquid Collectors" first built by Minardi and Chuang in 1975 which used a heat transfer liquid consisting of 3 parts Prestone II, 2 parts water and 3 grams India ink per liter.  The liquid was translucent, but it absorbed 98% of the incident solar radiation withing the first 1/4".

Minardi and Chuang performed further experimentation with tube spacing and and various additives.  Graphite was found to be the most absorbent.  It was also found that when the tubes were spaced one diameter apart the efficiency improved.  This is thought to be due to the greater angular collection area and the collectors ability to collect scattered light.  Similar results have been noted with Evacuated Heat Tubes.

Twin wall polycarbonate may not have the advantage of increased angular collection area, but the simplicity and cost of this system still makes it an attractive option which I look forward to using.

Sunday, January 8, 2012

Garden in my shop

I had an epiphany today.  My 48' x 36' shop has south facing doors.  My plan is now to remove a roll up door and replace it with polycarbonate and build an 8'x10' aquaponic room within the shop.  The material costs will be much less than if I insulate my existing greenhouse and I should be able to control the environment much easier within the shop. 
I found a pretty decent article about how to calculate the requirements of a Passive Solar Thermal Mass System. But I'm still looking for the entire package.  It's unbelievable that this information is so hard to find.

In an effort to understand the process I created this spread sheet.   
This spread sheet contains the formulas and data for Specific Heat Density and Volumetric Heat Density.  It's is probably more than we need to know.

I would like to add Coefficient of Heat Transfer and then create a systematic approach to entering the required data in order to design a Solar Thermal Storage System.

Just for grins, I just did a measurement of an unheated room inside my shop.  This room has no insulation in the floor and R19 in the walls and ceiling of this room which takes up about 1/4 of my shop.  The outside temperature has ranged from 43F - 65F and inside the room has ranged from 46 to 56F.   So what I learned from this is that the thermal mass inside this room levels out  near the low end of our daily temperature swings.

Update June 15, 2012
It's now June 2012 and the temperatures are over 100F  With the ad of an evaporative cooler the garden room stays at about 82F.  In February with a little help from an electric water heater element in line with the pump the room stayed a comfortable 70F.   The power to control the environment is probably costing me about $1.50 - $2.00 a day at 33 cents per Kilowatt Hour.  
Compared to previous green house attempts this is extraordinary.   This is still my first year and I'm experimenting, but I think I used too much supplemental lighting during the winter months.  Next winter I will cut that back and only use it to extend the hours rather than add brighter light.